The following code is from: http://www.erik-rasmussen.com/blog/2008/01/18/the-filter-pattern-java-conditional-abstraction-with-iterables/


import java.util.Iterator;

import java.util.NoSuchElementException;


public abstract class Filter<T> {

  public abstract boolean passes(T object);


  public Iterator<T> filter(Iterator<T> iterator) {

    return new FilterIterator(iterator);

  }


  public Iterable<T> filter(Iterable<T> iterable) {

    return new Iterable<T>() {

      public Iterator<T> iterator() {

        return filter(iterable.iterator());

      }

    };

  }


  private class FilterIterator implements Iterator<T> {

    private Iterator<T> iterator;

    private T next;


    private FilterIterator(Iterator<T> iterator) {

      this.iterator = iterator;

      toNext();

    }


    public boolean hasNext() {

      return next != null;

    }


    public T next() {

      if (next == null)

        throw new NoSuchElementException();

      T returnValue = next;

      toNext();

      return returnValue;

    }


    public void remove() {

      throw new UnsupportedOperationException();

    }


    private void toNext() {

      next = null;

      while (iterator.hasNext()) {

        T item = iterator.next();

        if (item != null && passes(item)) {

          next = item;

          break;

        }

      }

    }

  }

}Wednesday, December 1, 2010
The Filter Pattern - Selective Iterators
Tuesday, November 30, 2010
A little insight on Java's 'type erasure' terminology
As everyone knows, generics have been introduced since Java 1.5 to enforce compile-time type-correctness. However, at run-time, all the type safety is removed via a process called 'type erasure'. So all typed Collections will have their type removed from the bytecode at runtime and explicit casts will be introduced when extracting elements from the Collections. For example List<Double> list = new ArrayList<Double>(); will be translated at runtime to List list = new ArrayList(); . As a result of type erasure, type parameters cannot be determined at runtime. This change has been introduced in ordered to ensure pre-Java 5 code (you may call it 'legacy code') inter-operates peacefully with the newly introduced generics.
Monday, November 15, 2010
[Spring Framework] Constructor vs. Setter injection
Following are a number of paragraphs stripped from "Spring in Action, 2nd Edition" ,by Craig Walls, published by Manning Publications in 2007, which illustrate in a rather friendly manner the ups and downs when opting for a particular type of mutator: [This goes in my blog as a future reference]
"There are certain things that most people can agree upon: the fact that the sky
is blue, that Michael Jordan is the greatest player to touch a basketball, and that
Star Trek V should have never happened. And then there are those things that
should never be discussed in polite company, such as politics, religion, and the
eternal “tastes great/less filling” debates.
Likewise, the choice between constructor injection and setter injection stirs up
as much discourse as the arguments surrounding creamy versus crunchy peanut
butter. Both have their merits and their weaknesses. Which should you choose?
Those on the constructor-injection side of the debate will tell you that:
• Constructor injection enforces a strong dependency contract. In short, a
bean cannot be instantiated without being given all of its dependencies. It is
perfectly valid and ready to use upon instantiation. Of course, this assumes
that the bean’s constructor has all of the bean’s dependencies in its param-
eter list.
• Because all of the bean’s dependencies are set through its constructor,
there’s no need for superfluous setter methods. This helps keep the lines of
code at a minimum.
• By only allowing properties to be set through the constructor, you are, effec-
tively, making those properties immutable, preventing accidental change in
the course of application flow.
However, the setter injection-minded will be quick to respond with:
• If a bean has several dependencies, the constructor’s parameter list can be
quite lengthy.
• If there are several ways to construct a valid object, it can be hard to come
up with unique constructors, since constructor signatures vary only by the
number and type of parameters.
• If a constructor takes two or more parameters of the same type, it may be
difficult to determine what each parameter’s purpose is.
• Constructor injection does not lend itself readily to inheritance. A bean’s con-
structor will have to pass parameters to super() in order to set private
properties in the parent object.
Fortunately, Spring doesn’t take sides in this debate and will let you choose the
injection model that suits you best. In fact, you can even mix-and-match construc-
tor and setter injection in the same application... or even in the same bean."
Saturday, October 9, 2010
Simple Apache Lucene tutorial courtesy of "Java Code Geeks"
http://www.javacodegeeks.com/2010/05/introduction-to-apache-lucene-for-full.html
Thursday, September 16, 2010
Change the GRUB Menu Timeout on Ubuntu
When your Ubuntu system boots, you will see the GRUB menu if you hit the Esc key, or if you’ve enabled the menu to show by default.
The only issue with this is that the default timeout is only 3 seconds.
You may want to increase this amount… or you may even want to decrease
it. Either one is simple.
Open up the /boot/grub/menu.lst file in your favorite text editor. I’m using gedit:
sudo gedit /boot/grub/menu.lst
Now find the section that looks like this:
## timeout sec
# Set a timeout, in SEC seconds, before automatically booting the default entry
# (normally the first entry defined).
timeout 3
The timeout value is in seconds. Save the file, and when you reboot
you will have that many seconds to choose the menu item you want.
show the GRUB menu by default on Ubuntu
When Ubuntu boots, you normally briefly see a screen that says “GRUB loading. please wait… Press Esc to enter the menu…”
If you are hacking around your system and would prefer to always see
the GRUB menu (to enter command-line options, for instance), there’s an
easy fix.
Open up the /boot/grub/menu.lst file in your favorite text editor. I’m using gedit:
sudo gedit /boot/grub/menu.lst
Now find the section that looks like this:
## hiddenmenu
# Hides the menu by default (press ESC to see the menu)
hiddenmenu
Put a # before hiddenmenu to comment that line out:
## hiddenmenu
# Hides the menu by default (press ESC to see the menu)
#hiddenmenu
Save the file, and you should see the menu the next time you reboot.
SOURCE: www.howtogeek.com
Adding windows XP to grub menu after intalling this OS AFTER Ubuntu
So your dual booting windows and you want windows to appear in the grub screen at startup. Here's how you do it:
As root:
# nano /boot/grub/menu.lst
Add the following lines in wherever you would like the entry to show up:
title MS Windows XP
root (hd0,0) [note below]
*
savedefault
makeactive
chainloader +1
*(hd0,0) means /dev/hda1
*(hd0,1) means /dev/hda2
As root:
# nano /boot/grub/menu.lst
Add the following lines in wherever you would like the entry to show up:
title MS Windows XP
root (hd0,0) [note below]
*
savedefault
makeactive
chainloader +1
*(hd0,0) means /dev/hda1
*(hd0,1) means /dev/hda2
Wednesday, July 7, 2010
SCDJWS 5, web service design patterns notes
Web Service Design Patterns
The
design patterns related to Web Service help to enhance
maintainability of the solution or to minimize QoS impact associated
with building applications using web service frameworks. Web Services
based interaction might be expensive because of
- operation
is expensive in term of server-side processing - communication
overhead (amount of data transfer/bandwidth) - encoding/decoding
may be expensive
Application
designers should look for alternatives in this situation.
Asynchronous Interaction Pattern
Goals
of this pattern are:
- decouple
input and output. - deliver
output from server to client. - Associate
output message with corresponding input message
This
can be achieved with various application level designs to achieve the
above goals which are Server-side push, Client-side pull. JMS-based
and JAX-WS based which are described below.
Server-side
push
Approach
1: Client supplies the address of a web service dedicated to
process specific response to the request, as part of request and the
server contacts the dedicated web service to reply to the query back
to the client.
Approach
2: Client supplies address of a generic web service that can be
invoked to supply the result of operation back to client, along with
unique token to identify this request, The server later invokes this
generic web service to deliver an answer to this client the server
uses the same token as part of response message to identify the
response to client. WS-Addressing defines a way to create these
tokens portably.
Client-side
pull
Client
issues a request along with a unique token to server, the server
accepts the request, allowing client to continue processing. server
process each request to obtain response and stores all responses
indexed by tokens supplied by client in each request in a data
structure accessible as a new Response web service. Each client
queries the new web service for answer to earlier requests using the
same token. Enough storage required on server side to store all
response, until the client retrieves it. For reliability the storage
might need to be persistence. Increases network overhead as client
may poll periodically for it's response.
JMS
based
Non-portable
web service solution, uses JMS as message transport instead of HTTP.
Both Client-side pull and Server-side push can be implemented using
JMS. In case of Client-side pull the client uses multiple requests
first being a JMS message and the subsequent ones being synchronous
and portable.
JAX-WS
based
JAX-WS
introduces Dispatch<T> and Provider<T> interfaces to
describe client and server side of the interaction. On client side it
introduced the ability to indicate whether the interaction is
synchronous or asynchronous, whether it's Client-side pull or
Server-side push or one way.
Dispatch<T>{ // client-side
T invoke(T
msg);
Response<T>
invokeAsync(T msg);
Future<?>
invokeAsync(T msg, AsyncHandler<T> h);
void
invikeOneWay(T msg);
}
interface
Provider<T>{ // server-side
T invoke(T msg,
Map<String, Object> context);
}
Example
MessagingAPIMessagerequest = new MessagingAPIMessage( "sayHello", "Tracy"
);
MessagingAPIMessage
response = MessagingAPIMessage) port.invoke( request );
System.out.println("Response:
" + response.getResult());
AsyncHandler<Object>
responseHandler = new AsyncHandler<Object>() {
public void
handleResponse(Response<Object> resp){
try {
MessagingAPIMessage
result = (MessagingAPIMessage) response.get();
System.out.println(
"Response: " + result.getResult() );
} catch(
Exception e ) {
}
}
};
port.invokeAsync(
request, responseHandler );
Advantages:
More responsive application, JAX-WS provides transparent
implementation
Disadvantages: Other
than JAX-WS requires more complex designs
JMS Bridge
The
Characteristics of JMS Bridge pattern are as follow:
- Keep
different subsystems using their own JMS implementation - Introduce
a client which can relay messages from one JMS implementation to
next - the
JMS clients should be implemented as Web Services
Advantages:
No need to develop vendor specific to bridge two underlying
middle-ware vendor. It's vendor and JMS independent.
Disadvantage:
Overhead XML encoding/transmission and decoding
Web Service Cache
Cache
can be introduced at two places which will be transparent to client
(as Endpoint Handlers). The overhead is reduced by short-circuiting
requests that do not need to be executed.
Advantages:
Reduce communication and processing overhead
Disadvantage:
Increased memory
footprint, application must realize when to invalidate or refresh
cache.
Web Service Broker
Can
be used implement some services as Web Service and still address the
concerns that web services don't address like transaction
propagation. Web Service broker is introduced as a middle-man between
the client and the remote service in which the client is interested.
Can be implemented as a state-full session bean.
Advantage:
Simpler client design
Disadvantage:
Complex to implement (not guaranteed)
Web Service Logger
A
common approach to introduce logging into the design of an
application involves the application of Decorator pattern as follows:
An additional object is
introduced as a wrapper around the actual service provider.- The logging functionality is
captured in the wrapper.
Sunday, May 16, 2010
SQLalchemy tweak
If you've been ripping your hair off trying to figure out the "BoundMetaData is not defined" error in SQLAlchemy, the answer is to switch "BoundMetaData" with simply "MetaData", as the first one appears to have been deprecated. The Python code should look like this:
from sqlalchemy import *<br /><br />db = create_engine('sqlite:///MyDb.db')<br />metadata = MetaData(db)<br />

Useful SQLAlchemy links:
http://www.rmunn.com/sqlalchemy-tutorial/tutorial.html
http://www.sqlalchemy.org/docs/05/ormtutorial.html
Wednesday, April 14, 2010
basic xml-rpc communication between a python server and c# client
Setting up the python server
import calendar, SimpleXMLRPCServer
#The server object
class Calendar:
def getMonth(self, year, month):
return calendar.month(year, month)
def getYear(self, year):
return calendar.calendar(year)
calendar_object = Calendar()
server = SimpleXMLRPCServer.SimpleXMLRPCServer(("localhost", 8888))
server.register_instance(calendar_object)
#Go into the main listener loop
print "Listening on port 8888"
server.serve_forever()
Setting up the C# client
1. Download the helping DLL's from http://xml-rpc.net/
2. Create a proxy interface:
using System;
using CookComputing.XmlRpc;
namespace XMLRPCclient
{
[XmlRpcUrl("http://127.0.0.1:8888/")]
public interface IClientCalendarProxy : IXmlRpcProxy
{
[XmlRpcMethod("getMonth")]
string getMonth(int p1, int p2);
}
}
3. Init & run your client using the upper defined proxy interface (make sure the URL points to the port of the web service)
using System;
using CookComputing.XmlRpc;
namespace XMLRPCclient
{
class MainClass
{
public static void Main(string[] args)
{
Console.WriteLine("Hello World!");
IClientCalendarProxy proxy = XmlRpcProxyGen.Create<IClientCalendarProxy>();
string ret = proxy.getMonth(2002,8);
Console.WriteLine(ret);
}
}
}
Useful links:
- Start your exploration of XML-RPC on the official home page. The specification is also a very easy read.
- For reference, use the official Python docs for the XML-RPC client and server modules.
- Browse Useful Information Company's XML-RPC page for more sample XML-RPC services.
- If you plan to do significant work using the protocol, do read and bookmark Eric Kidd's XML-RPC HOWTO.
- Read Using XML-RPC for Web services: Getting started with XML-RPC in Perl, by Joe Johnston for an introduction to XML-RPC, and the follow-up XML-RPC Middleware.
Sunday, March 21, 2010
[windows] deleting winrar temporary data
If you've ever been in the situation where you have to unzip a large archive and you cancel the unzipping process midway, you will find that upon cancellation, the temporary winrar files will not be erased so you will find yourself losing 6,7 Gb of space just like that. To fix this, go to "Run" and type %temp% - this is the temporary folder on your computer, so just go on and delete all the unused stale data (such as winrar temporary files).

Friday, March 19, 2010
Many-To-Many self reference in Java Persistence API
Think of the following scenario: you need a many-to-many relationship between a table and itself... how can you accomplish that with JPA annotations ?
Suppose we have a table Tasks in the database which is mapped to an Entity named Task. A task entry should have a list of parent tasks (prerequisite tasks if you want) and a list of child tasks (tasks which upon the current task's completion would enable them to start). The Task entity class would look a little something like this:
@Entity
@Table (name = "Tasks" , schema = "ProjectManagement" )
public class Task implements Serializable {
// Mandatory @Id PK field
//constructors (including a no-arg constructor)
//fields
// getters and setters
@ManyToMany
@JoinTable ( name = "parent_child_task" ,
joinColumns = @JoinColumn ( name = "child_id" , referencedColumnName = "id" ),
inverseJoinColumns = @JoinColumn ( name = "parent_id" , referencedColumnName = "id" ))
private List<Task> prerequisiteTasks = new ArrayList<Task>();
@ManyToMany (mappedBy = "prerequisiteTasks" )
private List<Task> childTasks = new ArrayList<Task>();
//.... more
}
Hope this makes sense
Wednesday, March 17, 2010
Operations allowed in EJB 3.0 session beans
- Operations Allowed in the Methods of a Stateful Session Bean
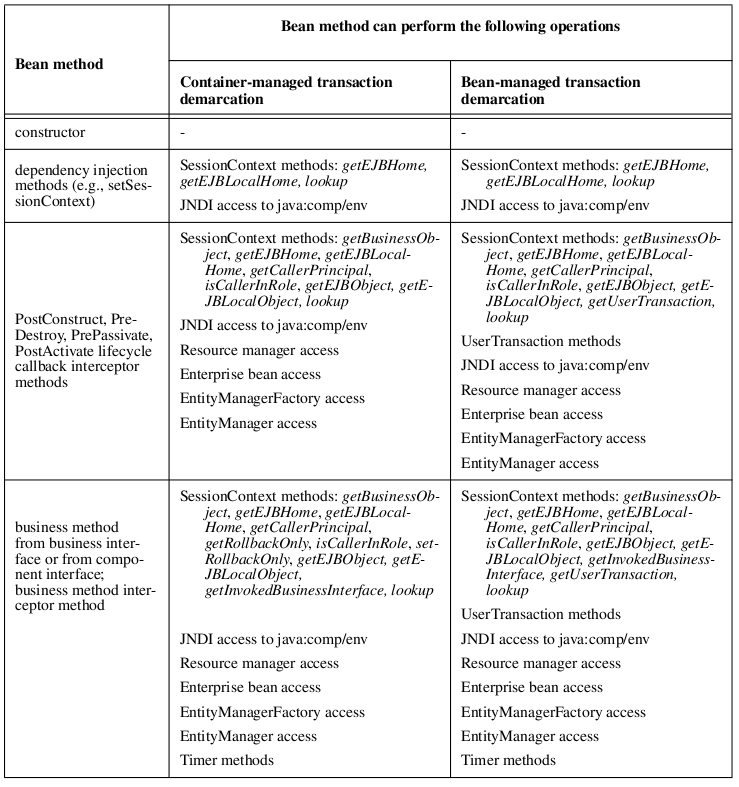

- Operations Allowed in the Methods of a Stateless Session Bean

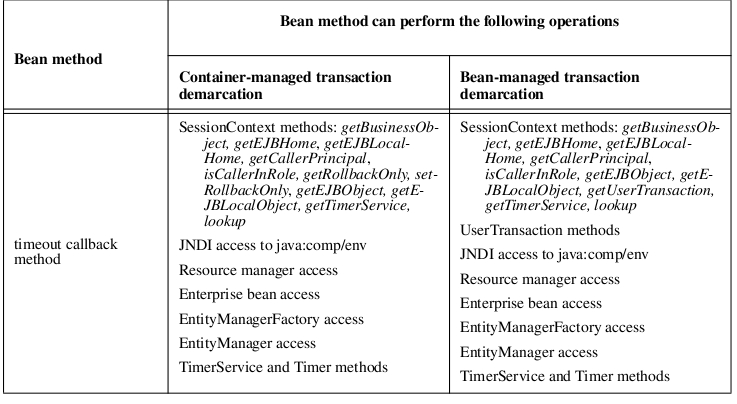
SOURCE: EJB 3.0 specification

Tuesday, March 16, 2010
Bulk Update and Delete Operations in EJB 3.0 JPQL
Bulk update and delete operations apply to entities of a single entity class (together with its subclasses, if any). Only one entity abstract schema type may be specified in the FROM or UPDATE clause.
The syntax of these operations is as follows:
update_statement ::= update_clause [where_clause]
update_clause ::= UPDATE abstract_schema_name [[AS] identification_variable]
SET update_item {, update_item}*
update_item ::= [identification_variable.]{state_field | single_valued_association_field} =
new_value
new_value ::=
simple_arithmetic_expression |
string_primary |
datetime_primary |
boolean_primary |
enum_primary
simple_entity_expression |
NULL
delete_statement ::= delete_clause [where_clause]
delete_clause ::= DELETE FROM abstract_schema_name [[AS] identification_variable]
Caution should be used when executing bulk update or delete operations because they may result in
inconsistencies between the database and the entities in the active persistence context. In general, bulk update and delete operations should only be performed within a separate transaction or at the beginning of a transaction (before entities have been accessed whose state might be affected by such operations).
SOURCE: EJB 3.0 Persistence Specification, pages 104-105

The syntax of these operations is as follows:
update_statement ::= update_clause [where_clause]
update_clause ::= UPDATE abstract_schema_name [[AS] identification_variable]
SET update_item {, update_item}*
update_item ::= [identification_variable.]{state_field | single_valued_association_field} =
new_value
new_value ::=
simple_arithmetic_expression |
string_primary |
datetime_primary |
boolean_primary |
enum_primary
simple_entity_expression |
NULL
delete_statement ::= delete_clause [where_clause]
delete_clause ::= DELETE FROM abstract_schema_name [[AS] identification_variable]
- A delete operation only applies to entities of the specified class and its subclasses. It does not cascade to related entities.
- The new_value specified for an update operation must be compatible in type with the state-field to which it is assigned.
- Bulk update maps directly to a database update operation, bypassing optimistic locking checks. Portable applications must manually update the value of the version column, if desired, and/or manually validate the value of the version column.
- The persistence context is not synchronized with the result of the bulk update or delete.
Caution should be used when executing bulk update or delete operations because they may result in
inconsistencies between the database and the entities in the active persistence context. In general, bulk update and delete operations should only be performed within a separate transaction or at the beginning of a transaction (before entities have been accessed whose state might be affected by such operations).
SOURCE: EJB 3.0 Persistence Specification, pages 104-105
Saturday, March 6, 2010
Installing XAMPP on 64 bit Ubuntu
Installing and securing XAMPP:
http://www.codetorment.com/2009/10/20/guide-install-xampp-on-ubuntu/
Basic installing:
http://sadhas.wordpress.com/2009/10/01/install-xampp-in-ubuntu/
Similar topic:
http://azimyasin.wordpress.com/2007/11/13/running-xampp-in-64-bit-machine/

http://www.codetorment.com/2009/10/20/guide-install-xampp-on-ubuntu/
Basic installing:
http://sadhas.wordpress.com/2009/10/01/install-xampp-in-ubuntu/
Similar topic:
http://azimyasin.wordpress.com/2007/11/13/running-xampp-in-64-bit-machine/
Friday, March 5, 2010
How to configure Primary Key Generation in EJB 3 JPA
Introduction
TopLink may create entity identifiers (or primary keys) automatically using any of the following strategies defined by JPA:
- Sequence objects
- Identity Columns
- Tables
- Provider-assigned strategy
Using Sequence Objects
Using A Default Sequence
Specifying a Sequence
Using Identity Columns
Using a Table
Using A Default Table
Specifying a Table
The table generator defined in the preceding example would be mapped to the following table:
ID_NAME ID_VAL
Using a Default Generation Strategy
The following example demonstrates the use of the AUTO strategy:
Summary
The minimum configuration you can use to cause the automatic generation of identifiers is to add a@GeneratedValue annotation to the identifier field or property. If you are using a specific named database sequence or table, you need to define the generator in the metadata with @SequenceGenerator or @TableGenerator annotations. SOURCE: http://www.oracle.com/technology/products/ias/toplink/jpa/howto/id-generation.html

Tuesday, March 2, 2010
JPA Inheritance mapping strategies
The mapping of class hierarchies is specified through metadata.
There are three basic strategies that are used when mapping a class or class hierarchy to a relational
database:
Support for the combination of inheritance strategies within a single entity inheritance hierarchy is not required by this specification.
2.1.10.1 Single Table per Class Hierarchy Strategy
In this strategy, all the classes in a hierarchy are mapped to a single table. The table has a column that serves as a “discriminator column”, that is, a column whose value identifies the specific subclass to which the instance that is represented by the row belongs.
This mapping strategy provides good support for polymorphic relationships between entities and for queries that range over the class hierarchy. It has the drawback, however, that it requires that the columns that correspond to state specific to the subclasses be nullable.
2.1.10.2 Table per Concrete Class Strategy
In this mapping strategy, each class is mapped to a separate table. All properties of the class, including inherited properties, are mapped to columns of the table for the class.
This strategy has the following drawbacks:
• It provides poor support for polymorphic relationships.
• It typically requires that SQL UNION queries (or a separate SQL query per subclass) be issued for queries that are intended to range over the class hierarchy.
2.1.10.3 Joined Subclass Strategy
In the joined subclass strategy, the root of the class hierarchy is represented by a single table. Each subclass is represented by a separate table that contains those fields that are specific to the subclass (not inherited from its superclass), as well as the column(s) that represent its primary key. The primary key column(s) of the subclass table serves as a foreign key to the primary key of the superclass table. This strategy provides support for polymorphic relationships between entities.
It has the drawback that it requires that one or more join operations be performed to instantiate instances of a subclass. In deep class hierarchies, this may lead to unacceptable performance. Queries that range over the class hierarchy likewise require joins.
SOURCE: EJB 3.0 JPA Specification

There are three basic strategies that are used when mapping a class or class hierarchy to a relational
database:
- a single table per class hierarchy
- a table per concrete entity class
- a strategy in which fields that are specific to a subclass are mapped to a separate table than the
- fields that are common to the parent class, and a join is performed to instantiate the subclass.
Support for the combination of inheritance strategies within a single entity inheritance hierarchy is not required by this specification.
2.1.10.1 Single Table per Class Hierarchy Strategy
In this strategy, all the classes in a hierarchy are mapped to a single table. The table has a column that serves as a “discriminator column”, that is, a column whose value identifies the specific subclass to which the instance that is represented by the row belongs.
This mapping strategy provides good support for polymorphic relationships between entities and for queries that range over the class hierarchy. It has the drawback, however, that it requires that the columns that correspond to state specific to the subclasses be nullable.
2.1.10.2 Table per Concrete Class Strategy
In this mapping strategy, each class is mapped to a separate table. All properties of the class, including inherited properties, are mapped to columns of the table for the class.
This strategy has the following drawbacks:
• It provides poor support for polymorphic relationships.
• It typically requires that SQL UNION queries (or a separate SQL query per subclass) be issued for queries that are intended to range over the class hierarchy.
2.1.10.3 Joined Subclass Strategy
In the joined subclass strategy, the root of the class hierarchy is represented by a single table. Each subclass is represented by a separate table that contains those fields that are specific to the subclass (not inherited from its superclass), as well as the column(s) that represent its primary key. The primary key column(s) of the subclass table serves as a foreign key to the primary key of the superclass table. This strategy provides support for polymorphic relationships between entities.
It has the drawback that it requires that one or more join operations be performed to instantiate instances of a subclass. In deep class hierarchies, this may lead to unacceptable performance. Queries that range over the class hierarchy likewise require joins.
SOURCE: EJB 3.0 JPA Specification
Monday, February 8, 2010


Monday, January 25, 2010
JNDI InitialContext reminder
When building J2EE apps which require JNDI lookup, make sure what type of clients are instantiating the InitialContext object: should it be a container-managed class (i.e. servlet, JSF bean,etc), all you need to do is write:
try {
Context ctx = new InitialContext();
IHelloRemote hello = (IHelloRemote) ctx.lookup("AnotherOne/HelloBean/remote");
hello.sayHello();
} catch (NamingException e) {
e.printStackTrace();
}
But should it be just a regular POJO (btw, you CAN'T use dependency injection in EJB3 POJOs) you have to set some properties which otherwise are set by default by the J2EE app server (at least when I tried it with JBoss it worked just fine):
try{
Properties properties = new Properties();
properties.put("java.naming.factory.initial", "org.jnp.interfaces.NamingContextFactory");
properties.put("java.naming.provider.url","jnp://localhost:1099");
properties.put("java.naming.factory.url.pkgs", "org.jboss.naming:org.jnp.interfaces");
Context context = new InitialContext(properties);
IHelloRemote hello = (IHelloRemote) ctx.lookup("AnotherOne/HelloBean/remote");
hello.sayHello();
} catch (NamingException e) {
e.printStackTrace();
}
Go Spring-Framework yourself...
Sunday, January 24, 2010
Configuring JMS destinations in Jboss 5
http://javabeanz.wordpress.com/2009/06/05/configuring-jms-in-jboss-5/

Saturday, January 23, 2010
Dealing with transactions ( from EJB3 in Action, Chapter 12 - Effectively integrating EJB3 across your application tiers, Manning publications, 2007)
Remember from our discussion in chapter 6 that in your EJB applications you
can use either container-managed transactions (CMT) or bean-managed transac-
tions, in which you programmatically manage transactions using the User-
Transaction API. While CMT is not available in the web container, if your
application uses session beans they allow you to use CMTs and avoid User-
Transaction. We highly recommend you take advantage of CMT. For example,
if you want to make multiple EJB method calls from the same transaction, then
you may be tempted to do the following:
public class ActionBazaarRegistrationControllerServlet
extends HttpServlet {
...
//--- Do NOT do this!!! This is NOT recommended!!!
@EJB ItemManager itemManager;
@EJB categoryManager categoryManager;
@Resource private UserTransaction ut;
...
public void doPost(HttpServletRequest request,
HttpServletResponse response)
throws ServletException, IOException {
...
ut.begin();
...
categoryManager.addCategory(category);
itemManager.addItem();
itemManager.setCategory(category);
...
ut.commit();
}
...
}
In this example we are injecting the instances ItemManager and CategoryManager
and then invoking several methods on injected session beans. The first issue here
is that you have to write error-prone code to demarcate the transaction. Second,
because your EJBs are fine-grained, the business logic gets scattered between the
EJBs and the web module. Finally, if the EJBs are remote, these translate to three
RMI calls, which can be expensive from a performance perspective. We suggest
you avoid this practice. If your application includes such a requirement, we rec-
ommend you create a session façade and use that to perform all operations, and
then invoke that EJB from the web tier.
Friday, January 22, 2010
Horrors of the past (IE)
Someone I trust recently told me that the only reason she's not switching to ubuntu linux is that it doesn't have internet explorer on it on which she can test her web applications - with IE being (surprisingly) the most widely-used internet browser in the world, all web apps have as starting requirement "MUST work on internet explorer and other browsers", so if it works on Mozilla and Opera and not on IE, your web application is close to worthless. So here's a little solution to have both the liberty of Ubuntu and the dying shade of IE integrated with it - kind of like a benign form of cancer if you will.
1. Go to Administration/synaptic package manager and install the playonlinux package (which will also install wine as a prerequisite)
2. go to Games/Playonlinux
3. click on the install button in the upper menu
4. search for "Internet explorer" in the search bar
5. install it and despair
NOTE: for the sake of easy accessing, don't forget to tick the option at the end of the installation which will add an icon of IE to your main menu
P.S. When searching for Internet explorer you will find that Playonlinux supports a huge variety of windows software from development tools all the way to the pc games. Windows has had great longevity but its days are numbered to say the least
Monday, January 18, 2010
Polymorphic queries in JPQL ?!
You may be surprised to find out that JPA supports polymorphism, and that JPQL
queries are polymorphic. This means a JPQL query to retrieve a parent entity in an
entity hierarchy is not just limited to the entity, but retrieves all subclasses as well.
For example, in ActionBazaar any query to retrieve User entities will retrieve its
subclasses, such as Seller, Bidder, and Admin.
Suppose we have a query like this:
SELECT u
FROM User u
WHERE u.firstName LIKE :firstName
The query will retrieve all instances of Seller, Bidder, Admin, and so forth that
match this query condition. How do you handle a polymorphic query in your client
code? Consider the following:
query = em.createNamedQuery("findUserByName");
query.setParameter("firstName", firstName);
List<User> users = query.getResultList();
Iterator i = users.iterator();
while (i.hasNext()) {
User user = (User) i.next();
System.out.print("User:"+emp.getUserId());
if (user instanceof Seller) {
Seller seller = (Seller) user;
System.out.println("Seller:" +
seller.getCommissionRate());
}
else if (user instanceof Bidder) {
Bidder bidder = (Bidder) bidder;
System.out.println("Bidder:" +
bidder.getDiscountRate());
}
}
This code snippet uses the instanceof keyword to test user. Some Java gurus
recommend you avoid using instanceof, but we use it here as a last resort.
You have to ensure that your operations are just as polymorphic as your que-
ries! In our example, you can easily convert the operations to be polymorphic by
adding a getRate method in all entities. The getRate method will return the
commissionRate for the Seller entity, whereas it will return the discount-
Rate for the Bidder entity. The resulting code should look like this:
Iterator i = users.iterator();
while (i.hasNext()) {
User user = (User)i.next();
System.out.print("User:" + emp.getUserId());
System.out.println(user.getRate());
Source: Enterprise Java Beans 3 in Action,chapter 10, Manning publications, 2007
}
Sunday, January 17, 2010

Friday, January 15, 2010
J2EE EAP reminder
After properly configuring jboss with respect to the last 2 posts, don't forget to add jbossall-client.jar to the EJB module's classpath

configure mysql data source in jboss [part 2]
This and previous post work hand in hand to make jpa work in mysql
http://community.jboss.org/thread/130668

http://community.jboss.org/thread/130668
how to setup a mysql data source in Jboss
Download the driver
Source: http://community.jboss.org/wiki/SetUpAMysqlDatasource

First, http://www.mysql.com/products/connector/j/ appropriate for your edition of mySQL.
Next, untar/unzip it and extract the jar file.
Copy the jar file into $JBOSS_HOME/server/xxx/lib, where xxx is your config name (such as "default") NOTE: For JBoss 4.0.2, use the jar file mysql-connector-java-3.1.8-bin.jar, not mysql-connector-java-3.1.8-bin-g.jar.
Copy the $JBOSS_HOME/docs/examples/jca/mysql-ds.xml file to $JBOSS_HOME/server/xxx/deploy
Configure the datasource
Edit the mysql-ds.xml file.
Replace <jndi-name>MySqlDS</jndi-name> with your datasource name. If you choose to make mySQL your default database (DefaultDS), then call this DefaultDS and be sure to delete the example $JBOSS_HOME/server/all/deploy/hsqldb-ds.xml which is also configured to be DefaultDS.
Replace <connection-url>jdbc:mysql://mysql-hostname:3306/jbossdb</connection-url> with your connection string. Generally you just need to replace mysql-hostname with your host. Be sure that your user has permission to connect to that hostname.
Set the user-name and hostname elements to your database username and hostname
Advanced options for the MySQL Driver can be set with <connection-property name="property">value</connection-property>.
Refer to MySQL Connector/J Manual Chapter 2 for more Information.
Source: http://community.jboss.org/wiki/SetUpAMysqlDatasource
simple EJB3 JPA mappings+code example
Consider the following DB schema:

Now let's create the following entities: Movie, User and Screening. Figure out the mappings from the upper diagram
package com.cinema.entities;
import java.io.Serializable;
import java.util.Set;
import javax.persistence.*;
@Entity
@Table(name="Movie")
public class Movie implements Serializable{
@Id
@Column(name="ID")
private int id;
@Column(name="title")
private String title;
@Column(name="genre")
private String genre;
@Column(name="duration")
private int duration;
@Column(name="director")
private String director;
@OneToMany(mappedBy="movie")
private Set screenings;
public Movie() {}
public Movie(String title, String genre, int duration, String director) {
super();
this.title = title;
this.genre = genre;
this.duration = duration;
this.director = director;
}
public Set getScreenings() {
return screenings;
}
public void setScreenings(Set screenings) {
this.screenings = screenings;
}
public int getId() {
return id;
}
public void setId(int id) {
this.id = id;
}
public String getTitle() {
return title;
}
public void setTitle(String title) {
this.title = title;
}
public String getGenre() {
return genre;
}
public void setGenre(String genre) {
this.genre = genre;
}
public int getDuration() {
return duration;
}
public void setDuration(int duration) {
this.duration = duration;
}
public String getDirector() {
return director;
}
public void setDirector(String director) {
this.director = director;
}
}
package com.cinema.entities;
import javax.persistence.*;
import java.io.Serializable;
import java.util.*;
@Entity
@Table(name="Screening")
public class Screening implements Serializable{
@Id
@Column(name="ID")
private int id;
@ManyToOne
@JoinColumn(name="Movie_ID", referencedColumnName="ID")
private Movie movie;
@Temporal(TemporalType.TIMESTAMP)
private Date time;
@ManyToMany(mappedBy="screenings")
private Set users;
public Screening(){}
public Screening(Movie movie, Date time) {
super();
this.movie = movie;
this.time = time;
}
public int getId() {
return id;
}
public void setId(int id) {
this.id = id;
}
public Movie getMovie() {
return movie;
}
public void setMovie(Movie movie) {
this.movie = movie;
}
public Date getTime() {
return time;
}
public void setTime(Date time) {
this.time = time;
}
public Set getUsers() {
return users;
}
public void setUsers(Set users) {
this.users = users;
}
}
package com.cinema.entities;
import java.io.Serializable;
import java.util.Set;
import javax.persistence.*;
@Entity
@Table(name="User")
public class User implements Serializable{
@Id
@Column(name="username")
private String username;
@Column(name="password")
private String password;
@Column(name="role")
private String role;
@ManyToMany
@JoinTable(name="Bookings",
joinColumns=
@JoinColumn(name="username", referencedColumnName="username"),
inverseJoinColumns=
@JoinColumn(name="Screening_ID", referencedColumnName="ID"))
private Set screenings;
public String getUsername() {
return username;
}
public User() {}
public User(String username, String password, String role) {
super();
this.username = username;
this.password = password;
this.role = role;
}
public void setUsername(String username) {
this.username = username;
}
public String getPassword() {
return password;
}
public void setPassword(String password) {
this.password = password;
}
public String getRole() {
return role;
}
public void setRole(String role) {
this.role = role;
}
public Set getScreenings() {
return screenings;
}
public void setScreenings(Set screenings) {
this.screenings = screenings;
}
}
There you go.... now edit persistence.xml and you're pretty much done:
xmlns:xsi="http://www.w3.org/2001/XMLSchema-instance"
xsi:schemaLocation="http://java.sun.com/xml/ns/persistence
http://java.sun.com/xml/ns/persistence/persistence_1_0.xsd" version="1.0">
org.hibernate.ejb.HibernatePersistence
Peace, out
Now let's create the following entities: Movie, User and Screening. Figure out the mappings from the upper diagram
package com.cinema.entities;
import java.io.Serializable;
import java.util.Set;
import javax.persistence.*;
@Entity
@Table(name="Movie")
public class Movie implements Serializable{
@Id
@Column(name="ID")
private int id;
@Column(name="title")
private String title;
@Column(name="genre")
private String genre;
@Column(name="duration")
private int duration;
@Column(name="director")
private String director;
@OneToMany(mappedBy="movie")
private Set
public Movie() {}
public Movie(String title, String genre, int duration, String director) {
super();
this.title = title;
this.genre = genre;
this.duration = duration;
this.director = director;
}
public Set
return screenings;
}
public void setScreenings(Set
this.screenings = screenings;
}
public int getId() {
return id;
}
public void setId(int id) {
this.id = id;
}
public String getTitle() {
return title;
}
public void setTitle(String title) {
this.title = title;
}
public String getGenre() {
return genre;
}
public void setGenre(String genre) {
this.genre = genre;
}
public int getDuration() {
return duration;
}
public void setDuration(int duration) {
this.duration = duration;
}
public String getDirector() {
return director;
}
public void setDirector(String director) {
this.director = director;
}
}
package com.cinema.entities;
import javax.persistence.*;
import java.io.Serializable;
import java.util.*;
@Entity
@Table(name="Screening")
public class Screening implements Serializable{
@Id
@Column(name="ID")
private int id;
@ManyToOne
@JoinColumn(name="Movie_ID", referencedColumnName="ID")
private Movie movie;
@Temporal(TemporalType.TIMESTAMP)
private Date time;
@ManyToMany(mappedBy="screenings")
private Set
public Screening(){}
public Screening(Movie movie, Date time) {
super();
this.movie = movie;
this.time = time;
}
public int getId() {
return id;
}
public void setId(int id) {
this.id = id;
}
public Movie getMovie() {
return movie;
}
public void setMovie(Movie movie) {
this.movie = movie;
}
public Date getTime() {
return time;
}
public void setTime(Date time) {
this.time = time;
}
public Set
return users;
}
public void setUsers(Set
this.users = users;
}
}
package com.cinema.entities;
import java.io.Serializable;
import java.util.Set;
import javax.persistence.*;
@Entity
@Table(name="User")
public class User implements Serializable{
@Id
@Column(name="username")
private String username;
@Column(name="password")
private String password;
@Column(name="role")
private String role;
@ManyToMany
@JoinTable(name="Bookings",
joinColumns=
@JoinColumn(name="username", referencedColumnName="username"),
inverseJoinColumns=
@JoinColumn(name="Screening_ID", referencedColumnName="ID"))
private Set
public String getUsername() {
return username;
}
public User() {}
public User(String username, String password, String role) {
super();
this.username = username;
this.password = password;
this.role = role;
}
public void setUsername(String username) {
this.username = username;
}
public String getPassword() {
return password;
}
public void setPassword(String password) {
this.password = password;
}
public String getRole() {
return role;
}
public void setRole(String role) {
this.role = role;
}
public Set
return screenings;
}
public void setScreenings(Set
this.screenings = screenings;
}
}
There you go.... now edit persistence.xml and you're pretty much done:
xmlns:xsi="http://www.w3.org/2001/XMLSchema-instance"
xsi:schemaLocation="http://java.sun.com/xml/ns/persistence
http://java.sun.com/xml/ns/persistence/persistence_1_0.xsd" version="1.0">
Peace, out
setup ftp server on ubuntu karmic
- 1Install a program called vsftpd. In order to do this, open up a command line and type sudo apt-get install vsftpd. You will be required to type in the root password and after that, just follow the instructions vsftpd gives you in order to install it.
- 2Change the configuration file. Get to the file browser and type /etc. Next scroll down and double click on a file called vsftpd.conf. Remember that lines that start with a '#' are commented out:
- Disable anonymous access: Change the "anonymous_enable" setting to NO
- Change the "local_enable" setting to YES.
- 3Restart the FTP server to enable your changes: in a shell window, type: sudo /etc/init.d/vsftpd restart
- 4Place the files you want to serve in the FTP Home Directory (~ftp).

Wednesday, January 13, 2010
my karmic koala's /etc/apt/sources.list with the best repositories around
# Ubuntu Karmic Koala 9.10 Repositories, from the_guv @ http://guvnr.com
#
#
# Ubuntu Karmic
#
deb http://archive.ubuntu.com/ubuntu karmic main restricted multiverse universe
deb-src http://archive.ubuntu.com/ubuntu karmic main restricted multiverse universe
deb http://archive.ubuntu.com/ubuntu karmic-backports main restricted universe multiverse
deb-src http://archive.ubuntu.com/ubuntu karmic-backports main restricted universe multiverse
deb http://archive.ubuntu.com/ubuntu karmic-updates main restricted multiverse universe
deb-src http://archive.ubuntu.com/ubuntu karmic-updates main restricted multiverse universe
deb http://security.ubuntu.com/ubuntu karmic-security main restricted universe multiverse
deb-src http://security.ubuntu.com/ubuntu karmic-security main restricted universe multiverse
deb http://security.ubuntu.com/ubuntu karmic-proposed main restricted universe multiverse
deb-src http://security.ubuntu.com/ubuntu karmic-proposed main restricted universe multiverse
#
# Canonical Commercial
#
deb http://archive.canonical.com/ubuntu karmic partner
deb-src http://archive.canonical.com/ubuntu karmic partner
deb http://archive.canonical.com/ubuntu karmic-backports partner
deb-src http://archive.canonical.com/ubuntu karmic-backports partner
deb http://archive.canonical.com/ubuntu karmic-updates partner
deb-src http://archive.canonical.com/ubuntu karmic-updates partner
deb http://archive.canonical.com/ubuntu karmic-security partner
deb-src http://archive.canonical.com/ubuntu karmic-security partner
deb http://archive.canonical.com/ubuntu karmic-proposed partner
deb-src http://archive.canonical.com/ubuntu karmic-proposed partner
#
# System Tools
#
# Ubuntu Tweak
# Must-have Ubuntu configuration tool .. http://ubuntu-tweak.com/about
# sudo apt-key adv --recv-keys --keyserver keyserver.ubuntu.com 6AF0E1940624A220
deb http://ppa.launchpad.net/tualatrix/ubuntu karmic main
deb-src http://ppa.launchpad.net/tualatrix/ubuntu karmic main
#
# Productivity
#
# Gnome-do
# Mac-like desktop apps dock for improved productivity .. http://do.davebsd.com/
# sudo apt-key adv --recv-keys --keyserver keyserver.ubuntu.com 28A8205077558DD0
deb http://ppa.launchpad.net/do-core/ppa/ubuntu karmic main
# Gnome-Globalmenu
# OS X-style global menu .. http://code.google.com/p/gnome2-globalmenu/
# sudo apt-key adv --recv-keys --keyserver keyserver.ubuntu.com 7889D725DA6DEEAA
deb http://ppa.launchpad.net/globalmenu-team/ubuntu karmic main
# Nautilus-dropbox
# File syncing online & across machines, with 2Gb space for free .. http://www.getdropbox.com/
deb http://linux.getdropbox.com/ubuntu karmic main
#
# Computer Graphics & Themes
#
# Compiz-Fusion
# Improved usability with jazzed up graphics .. http://www.compiz-fusion.org/
# sudo apt-key adv --recv-keys --keyserver keyserver.ubuntu.com 2ED6BB6042C24D89
deb http://ppa.launchpad.net/compiz/ubuntu karmic main
# Gnome Icon Theme
# Nice desktop graphics .. http://www.gnome-look.org/content/show.php/GNOME-colors?content=82562
# sudo apt-key adv --recv-keys --keyserver keyserver.ubuntu.com 2D79F61BE8D31A30
deb http://ppa.launchpad.net/gnome-colors-packagers/ppa/ubuntu karmic main
deb-src http://ppa.launchpad.net/gnome-colors-packagers/ppa/ubuntu karmic main
# Project Bisigi Themes
# Strikingly beautiful Gnome themes .. http://www.bisigi-project.org/?lang=en
# sudo apt-key adv --recv-keys --keyserver keyserver.ubuntu.com 6E871C4A881574DE
deb http://ppa.launchpad.net/bisigi/ppa/ubuntu karmic main
deb-src http://ppa.launchpad.net/bisigi/ppa/ubuntu karmic main
#
# Web browsers
#
# Chromium Browser
# Open-source Webkit browser, for testing Safari and Chrome .. http://dev.chromium.org/
# sudo apt-key adv --recv-keys --keyserver keyserver.ubuntu.com 5A9BF3BB4E5E17B5
deb http://ppa.launchpad.net/chromium-daily/ppa/ubuntu karmic main
# Epihany
# Another Webkit browser, for testing Safari and Chrome .. http://projects.gnome.org/epiphany/
# sudo apt-key adv --recv-keys --keyserver keyserver.ubuntu.com 2D9A3C5B
deb http://ppa.launchpad.net/webkit-team/epiphany/ubuntu karmic main
deb-src http://ppa.launchpad.net/webkit-team/epiphany/ubuntu karmic main
# Firefox
# Gecko browser
# sudo apt-key adv --recv-keys --keyserver keyserver.ubuntu.com 632D16BB0C713DA6
# deb http://ppa.launchpad.net/fta/ppa/ubuntu karmic main
# This gets latest beta .. for addon conpatability, add bolean to about:config: extensions.checkCompatibility
# sudo apt-key adv --keyserver keyserver.ubuntu.com --recv-keys 247510BE
# deb http://ppa.launchpad.net/ubuntu-mozilla-daily/ppa/ubuntu karmic main
# deb http://dl.google.com/linux/deb/ stable non-free
# Opera
# Presto browser
# sudo apt-key adv --recv-keys --keyserver keyserver.ubuntu.com 033431536A423791
deb http://deb.opera.com/opera/ stable non-free
#
# Communication
#
# Pidgin
# Multi-client instant messenger .. http://www.pidgin.im/
# sudo apt-key adv --recv-keys --keyserver keyserver.ubuntu.com 7FB8BEE0A1F196A8
deb http://ppa.launchpad.net/pidgin-developers/ppa/ubuntu karmic main
#
# Media
#
# Medibuntu
# Multimedia, entertainment and other distractions .. http://www.medibuntu.org/
# sudo apt-key adv --recv-keys --keyserver keyserver.ubuntu.com 2EBC26B60C5A2783
deb http://packages.medibuntu.org/ karmic free non-free
deb-src http://packages.medibuntu.org/ karmic free non-free
# VLC Player
# Media player, well decked with codecs .. http://www.videolan.org/vlc/
# sudo apt-key adv --recv-keys --keyserver keyserver.ubuntu.com D739676F7613768D
deb http://ppa.launchpad.net/c-korn/vlc/ubuntu karmic main
#
# Extend with Web Development Packages Tools
#
# Drizzle
# Modular relational db optimised for Cloud and Net apps, a MySQL fork .. https://launchpad.net/drizzle
deb http://ppa.launchpad.net/drizzle-developers/ppa/ubuntu karmic main
deb-src http://ppa.launchpad.net/drizzle-developers/ppa/ubuntu karmic main
#
# Graphics Tools
#
# Shutter
# Feature-rich screenshot program .. http://shutter-project.org/
# sudo apt-key adv --recv-keys --keyserver keyserver.ubuntu.com 009ED615
deb http://ppa.launchpad.net/shutter/ppa/ubuntu karmic main
deb-src http://ppa.launchpad.net/shutter/ppa/ubuntu karmic main
#
# Windows/OS Emulators, Translators, Virtualizers, all that
#
# PlayOnLinux
# Run Windows wares and games .. http://www.playonlinux.com/en
# sudo apt-key adv --recv-keys --keyserver keyserver.ubuntu.com FC6D7D9D009ED615
deb http://deb.playonlinux.com/ karmic main
# Setup a Virtual OS with Virtualbox (sure beats a dual-boot!)
# Virtualization software for guest OSes .. http://www.virtualbox.org
# sudo apt-key adv --recv-keys --keyserver keyserver.ubuntu.com DCF9F87B6DFBCBAE
deb http://download.virtualbox.org/virtualbox/debian karmic non-free
# Wine
# Run Windows apps .. http://www.winehq.org/
# sudo apt-key adv --recv-keys --keyserver keyserver.ubuntu.com 58403026387EE263
deb http://wine.budgetdedicated.com/apt karmic main
#
# Package Management
#
# Subversion
# Software versioning .. http://subversion.tigris.org/
# sudo apt-key adv --recv-keys --keyserver keyserver.ubuntu.com 6298AD34413576CB
deb http://ppa.launchpad.net/anders-kaseorg/subversion-1.6/ubuntu karmic main
deb-src http://ppa.launchpad.net/anders-kaseorg/subversion-1.6/ubuntu karmic main
#
# Other Applications
#
# Google
# Picassa, Google Desktop and maybe other stuff .. er, google it!
# sudo apt-key adv --recv-keys --keyserver keyserver.ubuntu.com A040830F7FAC5991
deb http://ppa.launchpad.net/chromium-daily/ppa/ubuntu karmic main
deb-src http://ppa.launchpad.net/chromium-daily/ppa/ubuntu karmic main

#
#
# Ubuntu Karmic
#
deb http://archive.ubuntu.com/ubuntu karmic main restricted multiverse universe
deb-src http://archive.ubuntu.com/ubuntu karmic main restricted multiverse universe
deb http://archive.ubuntu.com/ubuntu karmic-backports main restricted universe multiverse
deb-src http://archive.ubuntu.com/ubuntu karmic-backports main restricted universe multiverse
deb http://archive.ubuntu.com/ubuntu karmic-updates main restricted multiverse universe
deb-src http://archive.ubuntu.com/ubuntu karmic-updates main restricted multiverse universe
deb http://security.ubuntu.com/ubuntu karmic-security main restricted universe multiverse
deb-src http://security.ubuntu.com/ubuntu karmic-security main restricted universe multiverse
deb http://security.ubuntu.com/ubuntu karmic-proposed main restricted universe multiverse
deb-src http://security.ubuntu.com/ubuntu karmic-proposed main restricted universe multiverse
#
# Canonical Commercial
#
deb http://archive.canonical.com/ubuntu karmic partner
deb-src http://archive.canonical.com/ubuntu karmic partner
deb http://archive.canonical.com/ubuntu karmic-backports partner
deb-src http://archive.canonical.com/ubuntu karmic-backports partner
deb http://archive.canonical.com/ubuntu karmic-updates partner
deb-src http://archive.canonical.com/ubuntu karmic-updates partner
deb http://archive.canonical.com/ubuntu karmic-security partner
deb-src http://archive.canonical.com/ubuntu karmic-security partner
deb http://archive.canonical.com/ubuntu karmic-proposed partner
deb-src http://archive.canonical.com/ubuntu karmic-proposed partner
#
# System Tools
#
# Ubuntu Tweak
# Must-have Ubuntu configuration tool .. http://ubuntu-tweak.com/about
# sudo apt-key adv --recv-keys --keyserver keyserver.ubuntu.com 6AF0E1940624A220
deb http://ppa.launchpad.net/tualatrix/ubuntu karmic main
deb-src http://ppa.launchpad.net/tualatrix/ubuntu karmic main
#
# Productivity
#
# Gnome-do
# Mac-like desktop apps dock for improved productivity .. http://do.davebsd.com/
# sudo apt-key adv --recv-keys --keyserver keyserver.ubuntu.com 28A8205077558DD0
deb http://ppa.launchpad.net/do-core/ppa/ubuntu karmic main
# Gnome-Globalmenu
# OS X-style global menu .. http://code.google.com/p/gnome2-globalmenu/
# sudo apt-key adv --recv-keys --keyserver keyserver.ubuntu.com 7889D725DA6DEEAA
deb http://ppa.launchpad.net/globalmenu-team/ubuntu karmic main
# Nautilus-dropbox
# File syncing online & across machines, with 2Gb space for free .. http://www.getdropbox.com/
deb http://linux.getdropbox.com/ubuntu karmic main
#
# Computer Graphics & Themes
#
# Compiz-Fusion
# Improved usability with jazzed up graphics .. http://www.compiz-fusion.org/
# sudo apt-key adv --recv-keys --keyserver keyserver.ubuntu.com 2ED6BB6042C24D89
deb http://ppa.launchpad.net/compiz/ubuntu karmic main
# Gnome Icon Theme
# Nice desktop graphics .. http://www.gnome-look.org/content/show.php/GNOME-colors?content=82562
# sudo apt-key adv --recv-keys --keyserver keyserver.ubuntu.com 2D79F61BE8D31A30
deb http://ppa.launchpad.net/gnome-colors-packagers/ppa/ubuntu karmic main
deb-src http://ppa.launchpad.net/gnome-colors-packagers/ppa/ubuntu karmic main
# Project Bisigi Themes
# Strikingly beautiful Gnome themes .. http://www.bisigi-project.org/?lang=en
# sudo apt-key adv --recv-keys --keyserver keyserver.ubuntu.com 6E871C4A881574DE
deb http://ppa.launchpad.net/bisigi/ppa/ubuntu karmic main
deb-src http://ppa.launchpad.net/bisigi/ppa/ubuntu karmic main
#
# Web browsers
#
# Chromium Browser
# Open-source Webkit browser, for testing Safari and Chrome .. http://dev.chromium.org/
# sudo apt-key adv --recv-keys --keyserver keyserver.ubuntu.com 5A9BF3BB4E5E17B5
deb http://ppa.launchpad.net/chromium-daily/ppa/ubuntu karmic main
# Epihany
# Another Webkit browser, for testing Safari and Chrome .. http://projects.gnome.org/epiphany/
# sudo apt-key adv --recv-keys --keyserver keyserver.ubuntu.com 2D9A3C5B
deb http://ppa.launchpad.net/webkit-team/epiphany/ubuntu karmic main
deb-src http://ppa.launchpad.net/webkit-team/epiphany/ubuntu karmic main
# Firefox
# Gecko browser
# sudo apt-key adv --recv-keys --keyserver keyserver.ubuntu.com 632D16BB0C713DA6
# deb http://ppa.launchpad.net/fta/ppa/ubuntu karmic main
# This gets latest beta .. for addon conpatability, add bolean to about:config: extensions.checkCompatibility
# sudo apt-key adv --keyserver keyserver.ubuntu.com --recv-keys 247510BE
# deb http://ppa.launchpad.net/ubuntu-mozilla-daily/ppa/ubuntu karmic main
# deb http://dl.google.com/linux/deb/ stable non-free
# Opera
# Presto browser
# sudo apt-key adv --recv-keys --keyserver keyserver.ubuntu.com 033431536A423791
deb http://deb.opera.com/opera/ stable non-free
#
# Communication
#
# Pidgin
# Multi-client instant messenger .. http://www.pidgin.im/
# sudo apt-key adv --recv-keys --keyserver keyserver.ubuntu.com 7FB8BEE0A1F196A8
deb http://ppa.launchpad.net/pidgin-developers/ppa/ubuntu karmic main
#
# Media
#
# Medibuntu
# Multimedia, entertainment and other distractions .. http://www.medibuntu.org/
# sudo apt-key adv --recv-keys --keyserver keyserver.ubuntu.com 2EBC26B60C5A2783
deb http://packages.medibuntu.org/ karmic free non-free
deb-src http://packages.medibuntu.org/ karmic free non-free
# VLC Player
# Media player, well decked with codecs .. http://www.videolan.org/vlc/
# sudo apt-key adv --recv-keys --keyserver keyserver.ubuntu.com D739676F7613768D
deb http://ppa.launchpad.net/c-korn/vlc/ubuntu karmic main
#
# Extend with Web Development Packages Tools
#
# Drizzle
# Modular relational db optimised for Cloud and Net apps, a MySQL fork .. https://launchpad.net/drizzle
deb http://ppa.launchpad.net/drizzle-developers/ppa/ubuntu karmic main
deb-src http://ppa.launchpad.net/drizzle-developers/ppa/ubuntu karmic main
#
# Graphics Tools
#
# Shutter
# Feature-rich screenshot program .. http://shutter-project.org/
# sudo apt-key adv --recv-keys --keyserver keyserver.ubuntu.com 009ED615
deb http://ppa.launchpad.net/shutter/ppa/ubuntu karmic main
deb-src http://ppa.launchpad.net/shutter/ppa/ubuntu karmic main
#
# Windows/OS Emulators, Translators, Virtualizers, all that
#
# PlayOnLinux
# Run Windows wares and games .. http://www.playonlinux.com/en
# sudo apt-key adv --recv-keys --keyserver keyserver.ubuntu.com FC6D7D9D009ED615
deb http://deb.playonlinux.com/ karmic main
# Setup a Virtual OS with Virtualbox (sure beats a dual-boot!)
# Virtualization software for guest OSes .. http://www.virtualbox.org
# sudo apt-key adv --recv-keys --keyserver keyserver.ubuntu.com DCF9F87B6DFBCBAE
deb http://download.virtualbox.org/virtualbox/debian karmic non-free
# Wine
# Run Windows apps .. http://www.winehq.org/
# sudo apt-key adv --recv-keys --keyserver keyserver.ubuntu.com 58403026387EE263
deb http://wine.budgetdedicated.com/apt karmic main
#
# Package Management
#
# Subversion
# Software versioning .. http://subversion.tigris.org/
# sudo apt-key adv --recv-keys --keyserver keyserver.ubuntu.com 6298AD34413576CB
deb http://ppa.launchpad.net/anders-kaseorg/subversion-1.6/ubuntu karmic main
deb-src http://ppa.launchpad.net/anders-kaseorg/subversion-1.6/ubuntu karmic main
#
# Other Applications
#
# Picassa, Google Desktop and maybe other stuff .. er, google it!
# sudo apt-key adv --recv-keys --keyserver keyserver.ubuntu.com A040830F7FAC5991
deb http://ppa.launchpad.net/chromium-daily/ppa/ubuntu karmic main
deb-src http://ppa.launchpad.net/chromium-daily/ppa/ubuntu karmic main
Tuesday, January 12, 2010
Backup & restore MySQL DB basics
http://www.devshed.com/c/a/MySQL/Backing-up-and-restoring-your-MySQL-Database/
Saturday, January 9, 2010
Glassfish v2 install tip
If port 8080 is taken (on Ubuntu - of course) by the tcp6 service run the following:
netstat -anp | grep 8080
sudo kill [Process_ID]
this way when you run ant -f setup.xml on your glassfish installation folder, you won't run into trouble
netstat -anp | grep 8080
sudo kill [Process_ID]
this way when you run ant -f setup.xml on your glassfish installation folder, you won't run into trouble
Friday, January 8, 2010
Extra repositories for Karmic Koala
http://journalxtra.com/2009/11/extra-repositories-for-karmic-koala/
Saturday, January 2, 2010
A session bean alternative: Spring
Clearly, EJB 3 session beans are not your only option in developing your applica-
tion’s business tier. POJOs managed by lightweight containers such as Spring could
also be used to build the business logic tier. Before jumping on either the EJB 3
session bean or Spring bandwagon, think about what your needs are.
If your application needs robust support for accessing remote components or the
ability to seamlessly expose your business logic as web services, EJB 3 is the clear
choice. Spring also lacks good equivalents of instance pooling, automated session
state maintenance, and passivation/activation. Because of heavy use of annotations,
you can pretty much avoid “XML Hell” using EJB 3; the same cannot be said of Spring.
Moreover, because it is an integral part of the Java EE standard, the EJB container
is natively integrated with components such as JSF, JSP, servlets, the JTA transaction
manager, JMS providers, and Java Authentication and Authorization Service (JAAS)
security providers of your application server. With Spring, you have to worry whether
your application server fully supports the framework with these native components
and other high-performance features like clustering, load balancing, and failover.
If you aren’t worried about such things, then Spring is not a bad choice at all and
even offers a few strengths of its own. The framework provides numerous simple,
elegant utilities for performing many common tasks such as the JdbcTemplate
and JmsTemplate. If you plan to use dependency injection with regular Java
classes, Spring is great since DI only works for container components in EJB 3.
Also, Spring AOP or AspectJ is a much more feature-rich (albeit slightly more com-
plex) choice than EJB 3 interceptors.
Nevertheless, if portability, standardization, and vendor support are important to
you, EJB 3 may be the way to go. EJB 3 is a mature product that is the organic
(though imperfect) result of the incremental effort, pooled resources, shared own-
ership, and measured consensus of numerous groups of people. This includes the
grassroots Java Community Process (JCP); some of the world’s most revered com-
mercial technology powerhouses like IBM, Sun, Oracle, and BEA; and spirited open-
source organizations like Apache and JBoss.
Source: Enterprise Java Beans 3 in Action,chapter 3, Manning publications, 2007
Subscribe to:
Posts (Atom)